Basic Flyer
This basic paper airplane design is one of the first styles learned by most people. It is easy to learn, easy to reproduce, and flys relatively well. Below you will find a fold pattern and step-by-step instructions on creating this simple paper airplane.

- Fold or mark a piece of paper down the middle, shown in the diagram as line A.
- If you folded to mark the center line, unfold it so you are left with a full sheet of paper with a line down the middle.
- Fold along lines B in the same direction as your original fold (or on the same side as your mark, if you did not fold for step 1).
- Fold along lines C in the same direction as A and B.
- Fold along the center line A so that all previous folds are now on the inside of your fuselage.
- Fold down the wings along lines D to create your wings.
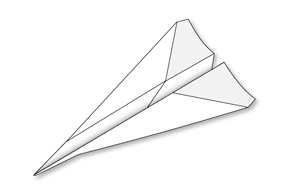
Once you are finished, the final result should look like the image below.
Alternate: Rather than folding straight down the fuselage to create horizontal wings, you can fold from the nose towards the tail at an angle to create a Dart Flyer, as seen in the picture below.
